
Yes you read the title correctly. Apparently the EOS 40D is capable of HD video recording at 720p and it doesn't even require a hack to the firmware!
To record video you simply connect the camera to a PC via USB, then run a little program that then outputs the current live view image to the folder of your choice as an AVI file in full 720p.
Here's the link to the site:
http://www.canonrumors.com/2009/01/video-with-any-liveview-eos-camera/
I haven't actually tried this for myself so I cannot vouch for the validity of the software or reliability. To me this type of thing is of novelty value only and the ability for a DSLR to shoot video is just not something I am not interested in. In my opinion it is just another sales gimmick or somethinhg to show off. It's not a serious tool for the serious photographer. If you want to shoot video then buy a video camera!
Personally I would much rather the camera manufacturers would spend time improving the photographic features of the cameras instead!
Cheers for now.
Tuesday, 3 February 2009
Thursday, 15 January 2009
Macro and live view
Since my wide angle lens is away for repair this week, I've decided to dig out my Canon 100mm macro lens and get some shots I've been meaning to get for a while. I've also been meaning to use the live view feature which I've never used in the 14 months I've had the Canon camera!
For normal landscape and portrait shots the live view feature really is of no use, but when it comes to macro photography where focusing is crucial, especially when depth of field is so limited, it really does come into its own. The live view doesn't only give you a larger view, it also allows you to zoom in on any particular area at 5x and 10x to ensure the focus is spot on. Auto focus is not supported in live view, but since macro photography really demands that you use manual focus this really isn't an issue.
There is one other feature that I've never looked at before that comes with the EOS utility software which is really amazing. 'Remote live view' allows to to view the image in real time on your computer monitor with real time DOF preview! you can also adjust the aperture and other settings from here and take the shot. The ability to see the image at such a large size on your PC and judge the actual DOF is a real godsend and I can't believe I've overlooked this for over a year!
So what am I shooting at the minute? Well I have some ideas for guitar closeups and reflections (see shot left) and a few other things which I'm keeping to myself! As usual if you are interested in seeing more of my work go to the website at www.chasethelight.co.uk.
Cheers for now.
For normal landscape and portrait shots the live view feature really is of no use, but when it comes to macro photography where focusing is crucial, especially when depth of field is so limited, it really does come into its own. The live view doesn't only give you a larger view, it also allows you to zoom in on any particular area at 5x and 10x to ensure the focus is spot on. Auto focus is not supported in live view, but since macro photography really demands that you use manual focus this really isn't an issue.
There is one other feature that I've never looked at before that comes with the EOS utility software which is really amazing. 'Remote live view' allows to to view the image in real time on your computer monitor with real time DOF preview! you can also adjust the aperture and other settings from here and take the shot. The ability to see the image at such a large size on your PC and judge the actual DOF is a real godsend and I can't believe I've overlooked this for over a year!
So what am
 I shooting at the minute? Well I have some ideas for guitar closeups and reflections (see shot left) and a few other things which I'm keeping to myself! As usual if you are interested in seeing more of my work go to the website at www.chasethelight.co.uk.
Cheers for now.
Sunday, 11 January 2009
Sigma 10 - 20mm lens softness problems
Well it seems there's a serious problem with my Sigma wide angle lens! I was examining some recent photo's when I noticed that the left side of the images looked soft, particularly if there was dense foliage there. I don't know how long the lens has been like this because if there is not a lot of detail on the left side it is actually hard to detect. Below are a sample from the left side and the right side of the same image, shot at 10mm, F16 with the focus point set at 4 feet so everything in the frame from about 2 feet and back should be in sharp focus. Spot the obvious softness on the left!


I googled the subject last night and discovered that this is actually a very common problem on this particular lens called 'decentering', mostly affecting the right side and on brand new lenses too! How the hell does something like this get past Sigma QC, especially if it is happening as often people are claiming?
My particular lens is actually around 14 months old now so it is well past the warranty which means I'll have to cough up for the repair. I've emailed Sigma support for a quote and the turnaround time is usually about 2-3 weeks, so in the meantime I'll dig out my Canon 100mm macro lens as I've been meaning to capture some ideas that I have.
Cheers for now.
Friday, 2 January 2009
Glenariff forest, the glens of Antrim
Firstly a happy new year to everyone! I hope you all have enjoyed the festive season and are looking forward to what 2009 will bring.
I took the opportunity this week to visit Glenariff forest park in the Glens of Antrim. This area is famous for its glens and waterfalls which really are stunning. I'd been meaning to go here for sometime, so knowing it would be quiet this week I got up early and headed over.
Following the signs the first main waterfall you come to is 'Ess-na-Larach' which is a huge thin waterfall that looks to drop at least 40 feet in two sections. This waterfall is quite deep in the glen which means that the light level is low. This leads to another issue - I like to shoot waterfalls at around 1 to 2 seconds. Anymore than that and the water just looks like a huge blown out blob with no detail at all. Even whacking the ISO up to 400 and dropping the aperture to F9 only yielded shutter speed of 11 seconds! Far to slow!
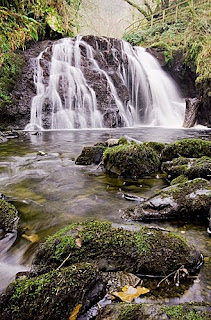 I decided to move on to see what else there was along the route as only two large waterfalls are shown and named on the fixed maps that are dotted around the forest. There are many other smaller waterfalls, one in particular is really spectacular (shown left) and I'm sure this must have a name! If anyone out there knows then please let me know.
I had the same issue here with low light all though not as bad as before. This image was shot at 1.5 seconds at F11, ISO 400.
There are many other small waterfalls along here although access to some are impossible without risking a broken neck due to the height of some of the walkways of the ground!
The last one I visited is called 'Ess-na-Crub' which really is spectacular and has excellent access off the walkway to get up close and personal!
This waterfall (shown right) consists of three main shafts of water with lots of little streams and trickles which make this one very photogenic. On days where there has been alot of rain I believe this one is really transformed into something completely different, so well worth another visit on one of these type of days!
Anyone interested in seeing the rest of the shots can see them on the website at www.chasethelight.co.uk.
Thanks for listening.
I took the opportunity this week to visit Glenariff forest park in the Glens of Antrim. This area is famous for its glens and waterfalls which really are stunning. I'd been meaning to go here for sometime, so knowing it would be quiet this week I got up early and headed over.
Following the signs the first main waterfall you come to is 'Ess-na-Larach' which is a huge thin waterfall that looks to drop at least 40 feet in two sections. This waterfall is quite deep in the glen which means that the light level is low. This leads to another issue - I like to shoot waterfalls at around 1 to 2 seconds. Anymore than that and the water just looks like a huge blown out blob with no detail at all. Even whacking the ISO up to 400 and dropping the aperture to F9 only yielded shutter speed of 11 seconds! Far to slow!
 I decided to move on to see what else there was along the route as only two large waterfalls are shown and named on the fixed maps that are dotted around the forest. There are many other smaller waterfalls, one in particular is really spectacular (shown left) and I'm sure this must have a name! If anyone out there knows then please let me know.
I had the same issue here with low light all though not as bad as before. This image was shot at 1.5 seconds at F11, ISO 400.
There are many other small waterfalls along here although access to some are impossible without risking a broken neck due to the height of some of the walkways of the ground!
The last one I visited is called 'Ess-na-Crub' which really is spectacular and has excellent access off the walkway to get up close and personal!
This waterfall (shown right) consists of three main shafts of water with lots of little streams and trickles which make this one very photogenic. On days where there has been alot
 of rain I believe this one is really transformed into something completely different, so well worth another visit on one of these type of days!
Anyone interested in seeing the rest of the shots can see them on the website at www.chasethelight.co.uk.
Thanks for listening.
Friday, 19 December 2008
ND Grad or multiple exposure blend?
This topic is something I see quite regularly on the various forums. People want to know if they need ND grads or split neutral density filters anymore since digital allows us to take more than one exposure to compensate for the difference in brightness (dynamic range) between the sky and ground.
Well the answer is you actually need both to cover all circumstances, as there a pros and cons to using each which I'll cover next.
ND Grad / Split Neutral Density
The filter method is quicker and allows you to get the photo as close to correct as possible 'in camera' which will greatly reduce the amount of time you need to spend in Photoshop. Also if you need to take the picture quickly or hand-held then this is the only way to go.
the main disadvantage to using the filter is the obvious change you will see between dark and light over objects that appear in front of the sky such as trees and buildings. Personally I quite like this effect and I don't think it detracts from the image. Some people really hate it though.
Multiple Exposures
This method is handy if you don't want to shell out for ND Grads or you want to capture more dynamic range than you would with the filter method. Basically you would take 2 or 3 exposures to cover the entire dynamic range then blend them in Photoshop.
The main disadvantages to this method are more time in front of the computer, no hand-held shots, tricky selections to get the blend right (can be a real nightmare with trees!).
you could use a program that specializes in HDR which will blend for you, however these type of pictures always have that HDR look to them that is not always what you want.
So it really comes down to personal preference, personally I like to use both methods depending on what I'm shooting at the time.
Thanks for listening.
Thursday, 4 December 2008
Sensor cleaning and chamber lubricant
I recently got hold of the Visible Dust Arctic Butterfly as I had some noticeable dust on the sensor of my Canon DSLR. I'd heard these were really good so I popped a battery in, turned it on for 10 seconds as directed and then swept the brush across the sensor. I then took a picture of the sky and examined it for dust. All dust spots gone!
I then went to one of my haunts early the next morning (5am) along the coast to get some sunrise shots. After the sun was fully up I noticed something in the top right corner of the view finder which looked like a couple of streaks. I assumed that these were on the my polariser so I gave it a clean, took another shot a rechecked. The streaks were still there which meant there had to be something on the sensor! Now during shooting I hadn't noticed as the light was very low, the chance had also passed to get the shots again, and anyway I don't carry any sensor cleaning kit in my bag as I'm not overly keen on cleaning my sensor on the beach for obvious reasons!
After I returned home I flipped the mirror up on the camera and had a look at the sensor. There were two or three large oily streaks on the sensor it self. Where had this come from? I can only assume that the Arctic Butterfly had caught some excess lubrication from the chamber which had later fallen onto the sensor.
The photo's I had taken all had these streaks on them and it took me an absolute age to clean them up. At one point I thought the shots were ruined, but I managed to save them.
The moral here is BE VERY CAREFUL WITH SENSOR CLEANING BRUSHES and do NOT touch the side of the chamber!
to remove the oil I bought Visible dust swabs (£50.00!!) which easily removed the residue.
Thanks for listening.
Saturday, 29 November 2008
Photoshop or Lightroom? or both?
Photoshop is a fantastic program isn't it?
However for photographers about 90% of the program isn't used or isn't relevant and this is understandable, as it's not just aimed at us photographers. So when Lightroom came along I thought, here's a program that will have all the photo editing related tools with Bridge all wrapped up in one package!
To a certain extent this is true, however there is one very important thing missing that will stop me ditching Photoshop: Layers!
Alot of my photography is landscape based and I regularly take two exposures, one for the sky and one for the foreground and then do a layer blend via a mask in Photoshop. I know that in Lightroom I can export to Photoshop for editing and then return it to Lightroom, but that kind of defeats the purpose doesn't it? You then lose the non-destructive RAW editing that Lightroom touts. Plus having to use both Photoshop and Lightroom is a real pain and very expensive!
I do love the features Lightroom offers especially version 2 with the new local exposure tools, but CS4 now offers these as well. So for the time being I won't be buying Lightroom and I will continue using Photoshop and Bridge as this combination can do everything that Lightroom does.
Thanks for listening.
Subscribe to:
Comments (Atom)


