Monday 16 November 2009

Tidal Flow Monochrome Series and DxO optics

Tidal Flow Series

I've been doing a lot of coastal shoots at dawn over the past few weeks, capturing water movement and doing monochrome conversions, and I've enjoyed capturing and working on these so much that I've decided to do a whole series of these images!

Capturing these types of shots can be quite difficult and does require a degree of patience. Finding strong focal points among similar rocks can be difficult, along with the fact that the tide dictates where you can shoot from to capture its
movement.


The beach can also be a dangerous place! My camera and myself have been hit and soaked by waves several times as I'm stubborn and don't want to move when I'm in a prime position! Although so far my camera and lenses have remained unscathed! I think my tripod is (literally!) on its last legs. All that salt water has been eating its way through the lower leg locks!


DxO Optics 6

Up until now I've always used Adobe Camera RAW in Bridge then done my final editing in Photoshop CS3. Now that I have discovered DxO Optics however, I'll be changing my workflow somewhat to accommodate this amazing RAW converter!

My favourite feature of this RAW converter is the lens distortion module. The makers of this program have profiled all the commonly used lenses for lens distortion, lens softness etc, and apply this correcting profile as part of the converting process. This feature is amazing for wide angle lenses where you get a curved horizon. Normally I would use the lens distortion filter in Photoshop. This does a good job but you also loose pixels due to essential cropping after its use.
DxO doesn't lose any pixels and does the correction automatically too.

The DxO lighting feature is also a favourite module, this works like Adobe RAW highlight recovery and fill light tools to even out the exposure, but again this does an excellent job automatically with very little input required from the user.

The downside? well there are a few. The program is slow, particularly if you have Bridge or Photoshop open. It only allows basic metadata edting so you will still need Bridge or whatever you use. It won't read in Adobe DNG files. I used to use Lightroom when it first came out and I converted a lot of my images to DNG. Unless you use the embedded option when saving to DNG you CANNOT convert them back. It doesn't output to PSD format. Not really a big issue but I save all my master files as PSD as TIFF's require a lot more space.

Is it worth it? definitely! Considering at the moment it only costs £69.00 it's worth that alone for the distortion correction feature, throw in all the other features too and it's an absolute bargain!

Try it for yourself. You can download a 30 day demo here that's completely unrestricted.


Sunday 25 October 2009

God Rays and Jammed Tripod Heads

The weather forecast looked promising for god rays on Sunday morning, those shafts of light that pierce through the clouds like huge torch beams. It's difficult to predict when they will appear, although I always seem to see them when I'm in my car driving somewhere without the camera!
Early morning and early evening presents the best chance of getting them as the sun is low in the sky. Some broken mid-level cloud is also required to 'channel' the sunlight into thin beams, but you also need a dose of luck and to be in the right place at the right time!

I set the alarm for 5am (actually 6am with the clocks going back) although unknown to me the alarm on my mobile phone had corrected itself for daylight saving so when I stepped outside it was already getting light! First mistake of the day.


It's an hour's drive to the coast so by the time I got there the sun was already coming up. I wasn't too concerned as the cloud cover was quite thick so sunrise shots were out of the question anyway, so that left only god-ray shots to try for.
As I made my way between the slippery rocks onto the beach I could see shafts of light breaking through the clouds! My prediction was correct but I had to work quickly as the wind was picking up so the light would not stay that way for long.
I grabbed the camera and checked out a couple of possible compositions before setting up the tripod. Once happy I got the tripod into a rough position and then went to attached the camera to head. This is where mistake number two happened. The camera would not lock into the head. Now I don't use cheap camera gear, the head is a Manfrotto geared one which cost a lot of money, but for some reason the lever that locks the plate was stuck in the locked position. It wouldn't budge and was jammed solid as a rock. I looked up at the light and could see already the light was changing and the god rays were starting to disappear! I had to think quickly - waste time with the head or try balancing the camera on the tripod while hand holding it? I went for the latter.


I did manage to get a couple of shots, but due to the faffing about and low light and high winds many of the shots had obvious camera shake. I was very lucky to get any shots at all though. When I got home I dismantled the head and found that the spring under the lever had dirt and dried salt in it which had caused it to seize up completely. The moral of this story is that don't just check your camera, lenses and filters before you go out on a shoot, check your tripod and head too or you may miss the opportunity to get some amazing shots!

Wednesday 7 October 2009

The Weather Guessing Game

Autumn is upon us once again and it's getting colder and darker in the mornings. I do love this time of year though, as it means that sunrise is now at a more respectable time. Now that's not to say that dragging myself out of bed on a cold dark Sunday morning at 5.30am is any easier, especially while everyone else is tucked up warm and snug in their beds! I'm always half tempted to bounce the alarm off the wall and turn back over, but I know that I'll hate myself later if I miss that beautiful pre-dawn light that I'm hedging my bets on will show itself.


It doesn't always work out like that though. You check the weather forecasts the day before and it looks promising, you check again at night and it still looks ok, you then wake up up at an ungodly hour and look out the window to see nothing but a blanket of low level cloud. How could the weather forecaster get it so wrong? or is this blanket of light choking cloud localised to my area? Do I risk an hour's drive to the coast only to find the same cloud cover there? It's the dilemma of every landscape photographer wishing to catch that fleeting beautiful light that welcomes the new day.


It's always a risk, as the light is never guaranteed anyway even if there is no low thick cloud cover. The best you can do is make an educated guess. Get it right and you have the potential to get some fabulous shots, get it wrong and you simply go home and have a nice big breakfast waiting for everybody else when they get up!

Tuesday 15 September 2009

The Mourne mountains revisited - Views from Doan

With the weather being so good this weekend, and the chances very high that we won't get weather this good again until next year, I decided to take myself off once again into the Mourne mountains in county Down.
My favourite view point is from the summit of Slieve Loughshannagh. From here you can almost see the whole mountain range and over to the coast on the west.
One peak that dominates the view is Doan, and even though it is very close to Slieve Loughshannagh and looks very accessible I've never actually climbed it, so I made a decision to do just that to see what the views are like from there!


I wanted to get some panoramic shots from the summit of Slieve Loughshannagh so I thought I would climb this first, get the shots then climb down the otherside then climb up Doan. I would then have to go back the way I came to get back to the car park. How hard could it be? Harder than I thought!


The climb up to the summit of Doan is actually more of a walk than a climb and is relatively easy. Once you reach the summit you are greeted by the most spectacular views. Doan sits almost in the very center of the Mournes so from here you have a 360 degree panoramic view of the whole area.


So if you are planning a walk in the Mournes, I highly recommend a visit to Doan.
If you are not up to a long hike then I recommend that you take the route that I did from the carpark just off Slievenaman road at the base of Slieve Loughshannagh.

Wednesday 26 August 2009

Glens of Antrim and Glenariff

The forecast on Monday was for clear weather with some sunshine, one of the few days this month to be rain free! and since there had been so much rain the previous few days, I though it would be a good idea to go up to Glenariff forest to get some shots of the waterfalls in full flow.


The glens themselves sit in a massive valley carved out by a glacier some 10,000 years ago, providing s wonderfully dense and varied landscape containing forest, waterfalls and rivers. There were two waterfalls in particular that I wanted to photograph, Ess-na-Crub and Ess-na-Laragh.

The last time I was here it never crossed my mind to bring wellies so that I could get up close and personal with the waterfalls, so this time I cam prepared! However by the time I walked down into the valley towards Ess-na-Crub I soon realised that entering the river was completely out of the question. There had been so much rain the previous few days that the water volume coming over the falls had probably doubled in volume, raising the water level enormously and producing so much spray and mist that photography was out of the question.
It was quite a sight though and the heavy rain did have the advantage of making the many smaller and normally unnoticed waterfalls quite spectacular!


Ess-na-Laragh was also more spectacular than usual and again the water levels and spray were way higher than normal meaning that entering the river was again out of the question, although I did manage to get a few shots from the walkway.


If you have never been to the Glens of Antrim or Glenariff then I highly recommend that you do. It is one of the most outstanding areas of natural beauty in Northern Ireland and well worth a visit. you won't be disappointed!

Tuesday 11 August 2009

Historical Belfast City

I've been living in Northern Ireland for nearly six years now and have worked quite a few of them in Belfast, although for some reason I've never actually taken any photos in or around this amazing city until now.


I guess it's because like most people who have something worth seeing right on their doorstep, they never actually get round to doing it because they can do it anytime they like! It was the same when I lived in Scotland. I was only a 40 mile drive from Loch Lommond but very rarely went there. Now that I'm living in Northern Ireland I wish I had made more of an effort to visit parts of Scotland like Loch Lommond when I was there.


Belfast is a city steeped in amazing history and one place that is really worth a visit is the titanic quarter, where the ill-fated titanic was built.(titanic dock and pump house shown above) This area is also home to the famous giant Harland and Wolff cranes which are fondly named "Samson and Goliath". These cranes dominate the skyline and can be seen from most parts of the city. Of course this area also still operates as a port today so some places are out of bounds to the general public and to photography as I found out when I tried to take some shots of the large operating cranes unloading the ships!


Now that I have been around the dock area its given me a taste to explore more of Belfast city, so if you have somewhere close by that you regularly think of visiting but never do, go and make a point of doing it and get out there now.

Tuesday 28 July 2009

Fine Art Monochrome Prints

I am pleased to announce that as from today, a selection of fine art monochrome images are available as prints from the fine art print collection.

All photographs will be printed by a professional lab using the Giclee process on Hahnemuhle fine art papers, of which I am currently offering two types:

Hahnemuhle Pearl - A bright white slightly textured 285gsm paper holds excellent detail, enables impressive contrast and depth while giving a beautiful pearl semi-gloss finish.

Hahnemuhle German Etching - A heavyweight 310gsm paper which is silky smooth with a fine surface texture, giving a matt finish and the attractive warm white shade of the traditional artist's board.

Both print types are available in sizes ranging from A5(5.8" x 8.3") right up to A2(16.5" x 23.4").

In the near future the option to have the prints mounted and matted for framing will also be available.

Tuesday 21 July 2009

Abstract Smoke images

With the weather being unpleasant again this weekend and me itching to get some camera action, I decided to try my hand at more abstract photography, only this time with smoke rather than ice.


As with images of water droplets, you will see quite a few examples of this type of abstract photography on various photography websites the Internet.

These types of images are actually quite easy to do. All you need is a camera on a tripod, an off camera flash, a black back drop, some incense sticks and a bit of patience!

Once the images are captured all manner of things can be done in Photoshop such as inverting the image, hand coloring the smoke trails and compositing different smoke plumes together.


As with most abstract work of this nature, big prints look really amazing and make excellent center pieces in the living room, dining room or several hanging along a hall.

If you are interested in detailed instructions on how these types of shots are done then please go to my Digital Photography Tutorials site where a tutorial will be available soon.

Saturday 20 June 2009

Recommended Photography Sites

There are literally hundreds of photography websites out there, some great one's and some mediocre one's, so I'm recommending a couple here that I visit on a regular basis because they are very informative, entertaining and may even help you improve your photography.

First up is The Mindful Eye. Until recently this was the Radiant Vista which is run by professional photographer and teacher Craig Tanner.
Craig is an outstanding photographer who really has a passion for teaching and photography in general. This site is really about helping photographers improve their craft for amateurs and pros alike.

The site offers a daily critique where you can send in an image and if you are lucky, Craig will post a video of him analyzing and then editing your shot in Photoshop. These videos offer great insight into how a professional photographer can see the final shot before editing and then the work flow involved in getting the shot there. This is an invaluable source of information if you are struggling with editing in Photoshop or any other image editing software.

There is also a large community forum where the users actively encourage each other and offer positive criticism and help on all aspects of their photography.

The second site I visit regularly is by photographer John Beardsworth. John is one of my favourite black and white photographers and has an excellent book available on the subject which I highly recommend.

His site offers a very entertaining blog which covers a wide variety of subjects including Photoshop, Aperture, Lightroom, color and monochrome photography, DAM, the visual arts and even computing tips.

Many of John's black and white images are also available to view on the site and I would highly recommend that you take a look.

Tuesday 9 June 2009

Fine Art Photography

What is your definition of fine art photography? The Wikipedia definition is "photographs that are created to fulfill the creative vision of the artist." This is the definition that I like. To me it is also any piece of beautiful artistic photographic work that is non-commercial that can be a landscape, a portrait, an abstract image or a macro image of some kind.


Different people have different definitions of what fine art photography is, some say it has to be black and white or monochrome, others say that the print has to be matted for framing before it can be called fine art. I do not subscribe to these at all. In truth fine art can be black and white / monochrome or color but I must admit that I do prefer black and white. My own fine art images are exclusively in black and white as I prefer this format for printing and framing. To say though that the photograph must be matted is a little obscure in my view. Surely it is about the image at the end of the day?


One thing I do see on a regular basis are personal photography websites touting themselves as fine art photographers and offering so-called fine art prints. Unfortunately many of these lack any artistic quality whatsoever and are merely record shots or snapshots. I doubt very much if they will see many sales of these! At the other end of the spectrum I also see truly fantastic photographic art on display in photography magazine reader galleries, that the photographer is not promoting or offering for sale or for print from their own site. I'm pretty sure this is down to lack of confidence from the photographer in their own work.

Wednesday 27 May 2009

Abstract Ice Images

I love abstract images and photos, particularly those that allow the viewer to see different images and shapes every time they are viewed. For me they also have to contain lots of detail and layers giving an illusion of depth.

One subject that makes great abstract art is ice, especially if there is a dominant color or tone through it. Given the right color and the right light the ice can be made to look metallic or like liquid metal or mercury.


Removing all color and only using black and white also produces excellent images that enhance the liquid metal effect even more. It's also possible to produce images that almost have an 'H.R. Geiger' quality to them.


Ultimately these type of images are best viewed at large sizes so that the detail can really be appreciated. Framing A2 size images and hanging them in a living room or lounge will really add impact to a place and also provides an interesting talking point!

Monday 18 May 2009

Greencastle and Narrow water castle

Northern Ireland like Scotland, has its fair share of castles and ancient monuments, two of which are around an hour's drive from my home and are both around seven miles apart. Like most ancient monuments and castles these are extremely photogenic due to their good condition and outstanding surrounding northern Irish countryside.


About five miles outside of Rostrevor (a place known for its folk music and fiddler's green festival) lies Greencastle royal castle which, I decided to visit first. built in the 13th century the castle is basically large rectangular keep with three vaulted chambers at the ground floor level. Access is free however it is only open two months of the year namely July and August, so if you want to get up close you will need to climb the fence and sneak in like I did!

Did I mention the weather? Saturday was one of those days forecast as 'changeable' which can produce some amazing skies for photography. Wind and torrents rain lashed down all the way there except for the odd two or three minutes of blue sky and amazing cloud formations. I was hoping to catch one of these pauses in the weather when I got to my chosen location. Just as I arrived at Greencastle the rain stopped for about ten minutes giving me just enough time to jump the fence, run up to the castle, fire off a few shots then dash back to the car again! amazing luck! Just as I got back to the car the weather closed in again with a torrential downpour.


About seven miles west of here just outside Warrenpoint, where the Newry river meets Carlingford lough, lies Narrow Water castle keep. This is a tower house building which was built originally by Hugh deLacy, Earl of Ulster in 1568.


The castle is in extremely good condition and is situated in a really beautiful spot, infact this whole area is outstanding with the Mourne mountains only a short distance from here.
Access for photography and general viewing is excellent, given that it is right beside the main A2 road. Access to the inside however is again restricted to July and August.

As before I was amazingly lucky with the weather as it briefly cleared as I got there for around another ten minutes, allowing me to get a few shots in the bag before the rain finally returned!

More images can be viewed in the Kingdom of Mourne and Irish countryside gallery and the Monochrome landscape gallery.

Bye for now.

Tuesday 5 May 2009

Water droplets part II

Last time I talked about shooting natural water droplets on rainy days when the weather is not to your liking for landscape photography, and with this weekend being another wet and windy one I decided to take the topic indoors and do some experimentation with man made ones!

I know some people think this subject is somewhat cliched but I love it! Each image is unique in its own way and there are countless variations that can be tried for some amazing effects.


Rather than go for the usual clear water into a clear pool I wanted to try and get a CG or computer rendered effect with bright bold colors, so for the shoot I used natural blue and red food dye.

Capturing the water droplets is not as hard as you may think. I know that some posts on this say that you need to be prepared to take a couple of hundred shots but I found this not to be the case if you setup carefully. The most important things are using an external flash ( I use the Canon Speedlite 430), preferably off camera to control the direction of light, a reflector of some kind to stop under exposure and a macro or telephoto lens to allow you to fill the frame but stay a safe distance from water splashes.


After some experimentation I found the following setup works very well:

External flash - set this to manual mode and set the output to 1/32 or lower. This doesn't affect the amount of light from the flash but rather the flash duration and allows you to freeze the drops in motion.
Reflector - Use a reflector or white card placed opposite the flash. I found that not doing this resulted in vastly under exposed images.
Camera - set this to manual mode and a shutter speed of 180. this isn't too important as with these kind of shots the flash duration is now your effective shutter speed. For focusing, place a ruler where the drops will fall. Frame and focus on this.

Once everything is setup it is just a matter of releasing water drops and firing off shots at different times, before and after hitting the water.


Once you have your shots why not try black and white conversions like the shot above. More images are available in the Macro images gallery on the website.

If you want to see some really amazing liquid sculptures and get some inspiration check out Martin Waugh's site at http://www.liquidsculpture.com/.

Have fun!

Monday 27 April 2009

Rainy days and water droplets

I'm not one of these people that only takes photographs on sunny days and never goes out when it's overcast or raining. Every type of weather offers different photographic opportunities and if you don't take them your really missing out!

I was planning to go back up to the Mourne mountains this weekend to an area around the 'Hares gap' that i haven't explored before, but the weather forecast was not good for the type of landscape images I was after (it was pouring with rain) so I decided to use the the rain to my advantage and grab some water droplet shots from my garden.


It's not often the conditions are favorable for these type of shots as often the rain is accompanied by wind, which can make it near impossible to get a macro shot due to your chosen subject swaying about! What you can do however is manually focus and sway 'in time' with the subject and rattle off a few high speed shots. you might get lucky!

The best way though is to shoot between showers and set the camera up on a tripod. Using the tripod will slow you down enough to compose the image properly without rushing it. You can then also use the 'live view' feature (if available) to ensure your focus is spot on.


try and get something of interest in the reflection of the chosen water droplet. It can be anything from another plant or tree to a landscape. Just ensure that whatever is reflected is in sharp focus.

Bye for now.

Tuesday 14 April 2009

The Mourne mountains revisited

This weekend I took myself off to the Mourne mountains again. It is such a photogenic place and is only around an hour's drive from where I live it's hard to resist, especially when the weather looks so promising.

I truly love this place, it has beauty in a very dramatic and desolate sense. In some parts it almost feels like and looks prehistoric, and it is very easy to forget that civilization surrounds it and is only just around the corner.

The brandy pad is a route I have never taken before. This starts at the foot of Slieve Meelmore and leads up past the hare's gap and up past Slieve Bearnagh. The track was created by smugglers and their heavily laden ponies as they transported illegal goods such as tobacco, spirits and leather inland from the east coast in the 18th and 19 centuries. It was so popular by 1835 that almost half the houses in Hilltown were pubs!


Once at the top of the path you climb over the Mourne wall and are then faced with the most amazing plateau that contains Doan and Slievelamagan. The view the stretches all the way down through and past the silent valley reservior to the sea. This is perfect for panoramic shots.


This area is very popular with hikers and climbers so if you don't want them in your images then you may need to be patient to get a clear uninterrupted view.

I will be returning here again in the near future as I didn't have the time (or the energy!) to explore the hares gap.

All the images are in the Kingdom of Mourne gallery.

Bye for now.

Tuesday 17 March 2009

The Mourne mountains (and B&W conversions)

I went back to one of my favorite photographic haunts this weekend, the Mourne mountain range in Northern Ireland! I have been there many times in the past but it has actually been a year since my last visit. I've had several ideas for pictures in the past but on every visit the weather just hasn't played ball! (does ever in the UK?)


The weather forecast looked like it could be promising with the chance of some of that type of weather that produces excellent conditions for 'god rays'. But unfortunately it wasn't to be. It stayed overcast so I put my B&W head on for the evening!

It's true that most good color pictures make good B&W ones, but overcast conditions make excellent B&W one's and poor color ones!

B&W Conversions
How do you do your B&W conversions? As we all know B&W is all about contrast so after you have added your B&W adjustment layer how do you adjust contrast locally?


There are no right or wrong ways here but some methods are 'cleaner' than others. I used to always have a separate layer for dodge and burn, but I found this time consuming and can sometimes produce a 'patchy' result.
I don't use these tools at all now, not since I realized that these tools are just contrast adjustments in the same way that the curves tool is. Dodging and burning with curves is far easier, quicker and cleaner than the said dedicated tools. The best method I have found is to break your photo into sections such as sky, foreground, background etc, then apply different curves adjustment layers to each. To dodge, simply boost the highlights at the top end of the curve until you get the effect your after, then do the same for the shadows by attenuating the curve at the bottom end.

A variety of black and white / monochrome conversions can be seen in the Mournes in monochrome gallery and the Monochrome landscape and macro gallery.

Bye for now!

Tuesday 3 February 2009

Canon EOS 40D and HD video recording

Yes you read the title correctly. Apparently the EOS 40D is capable of HD video recording at 720p and it doesn't even require a hack to the firmware!

To record video you simply connect the camera to a PC via USB, then run a little program that then outputs the current live view image to the folder of your choice as an AVI file in full 720p.

Here's the link to the site:
http://www.canonrumors.com/2009/01/video-with-any-liveview-eos-camera/

I haven't actually tried this for myself so I cannot vouch for the validity of the software or reliability. To me this type of thing is of novelty value only and the ability for a DSLR to shoot video is just not something I am not interested in. In my opinion it is just another sales gimmick or somethinhg to show off. It's not a serious tool for the serious photographer. If you want to shoot video then buy a video camera!

Personally I would much rather the camera manufacturers would spend time improving the photographic features of the cameras instead!

Cheers for now.

Thursday 15 January 2009

Macro and live view

Since my wide angle lens is away for repair this week, I've decided to dig out my Canon 100mm macro lens and get some shots I've been meaning to get for a while. I've also been meaning to use the live view feature which I've never used in the 14 months I've had the Canon camera!

For normal landscape and portrait shots the live view feature really is of no use, but when it comes to macro photography where focusing is crucial, especially when depth of field is so limited, it really does come into its own. The live view doesn't only give you a larger view, it also allows you to zoom in on any particular area at 5x and 10x to ensure the focus is spot on. Auto focus is not supported in live view, but since macro photography really demands that you use manual focus this really isn't an issue.

There is one other feature that I've never looked at before that comes with the EOS utility software which is really amazing. 'Remote live view' allows to to view the image in real time on your computer monitor with real time DOF preview! you can also adjust the aperture and other settings from here and take the shot. The ability to see the image at such a large size on your PC and judge the actual DOF is a real godsend and I can't believe I've overlooked this for over a year!

So what am I shooting at the minute? Well I have some ideas for guitar closeups and reflections (see shot left) and a few other things which I'm keeping to myself! As usual if you are interested in seeing more of my work go to the website at www.chasethelight.co.uk.

Cheers for now.


Sunday 11 January 2009

Sigma 10 - 20mm lens softness problems

Well it seems there's a serious problem with my Sigma wide angle lens! I was examining some recent photo's when I noticed that the left side of the images looked soft, particularly if there was dense foliage there. I don't know how long the lens has been like this because if there is not a lot of detail on the left side it is actually hard to detect. Below are a sample from the left side and the right side of the same image, shot at 10mm, F16 with the focus point set at 4 feet so everything in the frame from about 2 feet and back should be in sharp focus. Spot the obvious softness on the left!


I googled the subject last night and discovered that this is actually a very common problem on this particular lens called 'decentering', mostly affecting the right side and on brand new lenses too! How the hell does something like this get past Sigma QC, especially if it is happening as often people are claiming?

My particular lens is actually around 14 months old now so it is well past the warranty which means I'll have to cough up for the repair. I've emailed Sigma support for a quote and the turnaround time is usually about 2-3 weeks, so in the meantime I'll dig out my Canon 100mm macro lens as I've been meaning to capture some ideas that I have.

Cheers for now.

Friday 2 January 2009

Glenariff forest, the glens of Antrim

Firstly a happy new year to everyone! I hope you all have enjoyed the festive season and are looking forward to what 2009 will bring.

I took the opportunity this week to visit Glenariff forest park in the Glens of Antrim. This area is famous for its glens and waterfalls which really are stunning. I'd been meaning to go here for sometime, so knowing it would be quiet this week I got up early and headed over.

Following the signs the first main waterfall you come to is 'Ess-na-Larach' which is a huge thin waterfall that looks to drop at least 40 feet in two sections. This waterfall is quite deep in the glen which means that the light level is low. This leads to another issue - I like to shoot waterfalls at around 1 to 2 seconds. Anymore than that and the water just looks like a huge blown out blob with no detail at all. Even whacking the ISO up to 400 and dropping the aperture to F9 only yielded shutter speed of 11 seconds! Far to slow!

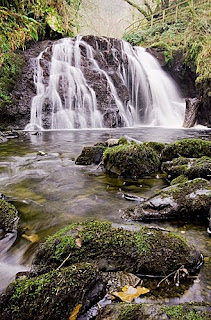
I decided to move on to see what else there was along the route as only two large waterfalls are shown and named on the fixed maps that are dotted around the forest. There are many other smaller waterfalls, one in particular is really spectacular (shown left) and I'm sure this must have a name! If anyone out there knows then please let me know.

I had the same issue here with low light all though not as bad as before. This image was shot at 1.5 seconds at F11, ISO 400.

There are many other small waterfalls along here although access to some are impossible without risking a broken neck due to the height of some of the walkways of the ground!


The last one I visited is called 'Ess-na-Crub' which really is spectacular and has excellent access off the walkway to get up close and personal!

This waterfall (shown right) consists of three main shafts of water with lots of little streams and trickles which make this one very photogenic. On days where there has been alot of rain I believe this one is really transformed into something completely different, so well worth another visit on one of these type of days!


Anyone interested in seeing the rest of the shots can see them on the website at www.chasethelight.co.uk.

Thanks for listening.